Sunday, 20 August 2023

How to download protected/view only files from google drive ?

 Sometimes you may have faced a situation like your friends or teachers has given you pdf, google docs, google sheets or video files with google drive links and when you open it you can preview the content of those files but when you try to download you will not get any download, copy, or print button because google has intentionally created those files with no download or print feature.


In general, these types of files are view-only or protected google drive files. Suppose you like download those files and save them locally then without a hack you cannot achieve. Don't worry guys I will help you. In this article, I will be explaining to you how to download protected view-only files from google drive.


Warning: For educational purposes only.

Steps to Download protected/view-only pdf files from google drive?

1. Open or Preview Any view-only or protected files from google drive.

2. Open Developer Console.

   If you are previewing in Google Chrome or Firefox

     Press Shift Ctrl J ( on Windows / Linux) or Option ⌘  (on Mac)

   If you are previewing in Microsoft Edge 

     Press Shift Ctrl + I 

   If you are previewing in Apple Safari

     Press Option ⌘ C

Then you will find yourself inside the developer tools.

3  Navigate to the "Console" tab.

4  Paste below code and press Enter


let jspdf = document.createElement("script");

jspdf.onload = function () {

let pdf = new jsPDF();

let elements = document.getElementsByTagName("img");

for (let i in elements) {

let img = elements[i];

console.log("add img ", img);

if (!/^blob:/.test(img.src)) {

console.log("invalid src");

continue;

}

let can = document.createElement('canvas');

let con = can.getContext("2d");

can.width = img.width;

can.height = img.height;

con.drawImage(img, 0, 0, img.width, img.height);

let imgData = can.toDataURL("image/jpeg", 1.0);

pdf.addImage(imgData, 'JPEG', 0, 0);

pdf.addPage();

}

pdf.save("download.pdf");

};

jspdf.src = 'https://cdnjs.cloudflare.com/ajax/libs/jspdf/1.5.3/jspdf.debug.js';

document.body.appendChild(jspdf);

5. Now, the pdf file start to downloads.

Note that it may take a long time for downloading if the size of the pdf is large because each page in the pdf is generated in the form of an image. Also, it doesn't guarantee the content quality of pdf remains the same.

Technical Concept:

On-page load each Image tag on the page is search, and 
 
if the image is not found then continue finding the Image tag on the next page of the pdf.
 
Else if found: then with the help of Canvas those images are created with the drawImage() function and here we are creating images in JPEG format and later these images are added back to pdf instance by addImage() function. After that, with the help of addPage() new page is created and the same repeats until reaching the end of the page and finally pdf is downloaded.
 
And this is all possible by the use of the jsPDF library which is provided by Cloudflare. Actually, this jsPDF library is Javascript open-source library for generating PDF files.
 

Monday, 26 December 2022

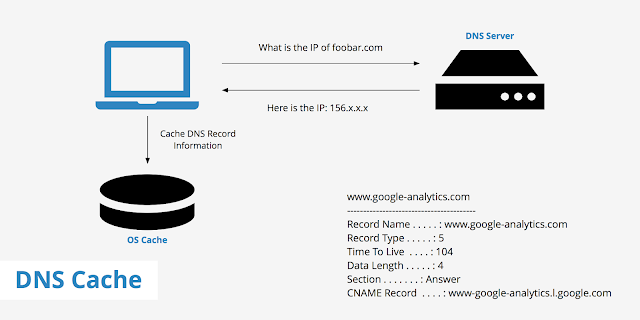
Clear DNS Cache from Web Browser and Mobile Device

What Is chrome://net-internals/#dns?

You can try this link on your browser and you will see the page where you can click Clear host cache to clear the DNS cache on Chrome.

The net-internals/#dns, also known as Net-Internals, is a NetLog event stream visualisation tool where you can view real-time logs or load NetLog dumps of later dates that keep the browser’s network-related events and state, helping troubleshoot and debug problems.

Is It Necessary to Clear DNS Cache on Chrome?

There are some situations when you need to perform chrome://net-internals/#dns.

  • When you are unable to access a website and the DNS entry has been changed.
  • When you changed the DNS servers of your network adapter and apply that setting.
  • When some errors repeatedly occur to tell you some commonly used websites are un-trusted.

How to Clear DNS Cache?

1.    Clear DNS Cache on Chrome

Step 1: Open your Chrome browser and go to this link: chrome://net-internals/#dns.

Step 2: Once you get to this page, you will see the page with the Clear host cache button and click on the button.

After this move, no message or prompt will show you the result but you have flushed the DNS cache on Google Chrome.

Step 3: Restart your Chrome browser and go to this link: chrome://net-internals/#sockets.

Step 4: Hit the Flush socket pools button and then restart your browser.

2.    Clear DNS Cache on Firefox

You can clear DNS cache on Firefox by simply restarting the browser for the cache is not maintained on the disk. Or if you don’t want to restart your browser, you can do as follows.

Step 1: Open your Firefox browser and enter this link in the address bar: about:networking#dns.

Step 2: On the next page, you can see some DNS cache details and choose the Clear DNS Cache button to clear the browser’s DNS cache.

3.    Clear DNS Cache on Safari

There is no direct button available for clearing the DNS cache on Safari but you can choose a hidden button to clear caches that include DNS caches.

Step 1: Launch Safari on your device and in the menu bar, choose Safari and then Preferences….

Step 2: In the Preferences pane, go to the Advanced tab and check the box next to Show Develop menu in menu bar.

Step 3: Then the Develop menu will appear in Safari’s menu bar and you need to click on it to choose the option of Empty Caches from the drop-down menu.

Then you can re-launch Safari and your cache will be cleared.

4.    Clear DNS Cache on Opera

To clear the DNS cache on Opera, you can do as follows.

Step 1: Launch Opera on your device and go to the link: opera://net-internals/#dns.

Step 2: On the next page, you can click the button labeled Clear host cache to flush the DNS cache.

Step 3: After that, go to the link: opera://net-internals/#sockets and click on the Flush socket pools button.

5.    Clear DNS Cache on Your Apple iPhone

To clear your iPhone DNS cache, you can directly restart the device, that will help clear out your DNS, or you can toggle Air-plane mode on and off.

Besides, you can reset network settings to clear DNS, but this method will clear your saved Wi-Fi and Bluetooth settings, which needs to be reconfigured.

Step 1: In Settings on your device, choose General.

Step 2: Scroll down to choose Transfer or Reset iPhone and then tap on Reset.

Step 3: Choose Reset Network Settings from the list and then confirm your option to save the choice.

After that, if you had previously customised your DNS servers, you must manually reset them again.

6.    Clear DNS Cache for Your Android

Android doesn't offer a direct way to clear the system's DNS cache within the UI, but you can flush the DNS cache using a browser as we have introduced above, like Chrome, Firefox, Opera, and Safari.

Just open your mobile phone and open the browser your are using to follow the above steps to clear the DNS cache. That will be easy to follow.

Monday, 12 December 2022

What are RUA and RUF in DMARC?

DMARC (Domain-based Message Authentication Reporting & Conformance) is an email validation and authentication system used to detect fraud, such as phishing and impersonation, and improve email deliverability.

DMARC works by protecting your domain and providing visibility over it through two reports: aggregated reports (RUA) and forensic reports (RUF).

To put it another way, DMARC allows you to have control over the use of your domain, preventing cybercriminals from applying scams and attacks using your domain, brand, and reputation.

Imagine that a bad guy is using your domain. This crook has sent emails to your clients and partners to steal data and money from them. The worst thing is that the email model is very similar to the one that you usually send. In these cases, it’s difficult to even convince your customers that it was a fake one.

The result of this kind of scam is that your brand and reputation can be damaged, with possible financial losses for the business.

How DMARC's validation process works

DMARC works by providing instructions for email servers. How? through a DMARC policy published in the DNS.

Basically, DMARC uses two email authentication protocols, SPF and DKIM, to help email servers identify whether a message is legitimate or not, and take action, such as sending the message to quarantine. It all depends, in fact, on how the policy was configured by the domain owner.

In addition, DMARC allows domain owners to receive reports on emails that have been delivered and/or rejected.

The difference between DMARC's RUA and RUF reports

RUA: what is a DMARC aggregate report?

RUA is a more general type of report. It provides an overview of all traffic or usage for a domain. In practice, aggregate reports (RUA) contain information about the result of authenticated emails and the source that sent them. That is, the domain used, the IP and the number of emails sent in a given period.

Aggregate reports may contain the following information:

  • Organization name.
  • Organization sending email address.
  • Extra contact information.
  • Report ID number.
  • Date range.
  • Header domain/from domain.
  • Alignment for DKIM and SPF.
  • Domain and subdomain policies (reject).
  • Percentage of messages to which the DMARC policy is to be applied.
  • IP information.
  • Total of IPs.
  • SPF and DKIM authentication result.

RUF: what is a DMARC forensic report?

We could say that RUF is a more complete report because it includes additional data about emails, such as subject, header, and information about attachments and URLs. A forensic report (RUF) may even be a complete copy of an email.

Due to compliance and privacy issues, many companies and organizations end up choosing not to request RUF reports. The goal is to prevent data breaches and to comply with laws and regulations that deal with sensitive and personal data.

Forensic reports may contain the following information:

  • IP information.
  • Subject line.
  • Time.
  • SPF, DKIM, and DMARC results.
  • ISP information.
  • From domain information.
  • Message ID.
  • URLs.
  • Delivery result.

Why use DMARC

Using DMARC, your company can improve its email delivery capabilities and, at the same time, protect itself against different types of attacks and threats, such as spamphishing, and spoofing campaigns.

When properly configured, DMARC ensures that you have visibility into the use of your domain. In this way, only authorized senders can send emails.

It’s an extra layer of security that prevents cybercriminals from using your brand and reputation to commit scams and fraud.

Friday, 9 December 2022

DNS Zone Transfer Types

Zone Transfer

Zone transfer is the process by which changes made on the primary server are replicated to all the secondary servers in the zone. There are three types of zone transfer to consider:

  • Full zone transfer

  • Incremental zone transfer

  • AD replication

Full Zone Transfer

Originally, the only method of replication between primary and secondary servers was the full zone transfer. With this method, the entire zone database file is transferred whenever an update is made. The zone transfer is performed through a "pull" mechanism rather than a "push." This means that the secondary servers initiate the zone transfer. The process is as follows:

  1. The secondary server waits a predetermined amount of time before contacting the primary server. When it does establish contact, it requests the primary server's Start of Authority (SOA) record.

  2. The primary server responds to the secondary server with its SOA record.

  3. Whenever a change is made to the primary name server, the serial number held in the SOA record is incremented. When the secondary server receives the SOA record from the primary server, it compares the serial number to its own. If the serial number in the SOA record sent by the primary server is higher than the serial number in the SOA record currently on the secondary server, the secondary server knows its zone database is out of date. It then sends a request back to the primary server for a full zone transfer. This full transfer is done through an AXFR request.

  4. The primary server then sends its full zone database file back to the secondary server. After the update is complete, the process begins again with the waiting period.

Incremental Zone Transfer

As you can probably imagine, performing a full zone transfer every time a single change is made to the primary server is inefficient. It also can generate a lot of network traffic if the primary server receives frequent updates and there are multiple secondary servers. To get around this problem, RFC 1995 allows for incremental zone transfers. As the name implies, with an incremental transfer, only the portion of the database that has been changed is replicated.

The process with an incremental transfer is the same as a full transfer, except with an incremental transfer, the secondary server sends an IXFR request, signifying an incremental transfer, rather than the AXFR request, which signifies a full zone transfer.

TIP

If you think of AXFR as A (all) XFR (transfer), it is easy to remember that AXFR is a full transfer. Likewise, you can think of IXFR as I (incremental) XFR (transfer).

For an incremental transfer to work, a version history must be kept so that name servers will know what changes have already been applied. The primary server maintains a version history, which keeps tracks of all changes that have been made since the last version update was transferred to a secondary server. When a secondary server requests an IXFR transfer, the primary server starts sending the recent updates, beginning with the oldest updates and progressing to the most recent updates.

When the secondary server begins receiving the updates, it creates a new version of the zone and begins applying the updates to that copy. When all the updates are committed to the copy of the zone database, the original database is replaced with the copy.

If the primary server does not support incremental transfers, it simply ignores the incremental request of the secondary server and performs a full zone transfer.

AD Replication

AD integrated zones are able to piggyback off of the standard AD replication scheme already in place on the network. Therefore, you do not have to manage a separate replication scheme for DNS data as you would if you used standard primary and secondary servers.

Friday, 31 May 2013

How to Install and Configure MRTG on Ubuntu Server 12.04


This post will describe how to install and configure Tobi Oetiker’s MRTG (Multi Router Traffic Grapher) on your Ubuntu home server. Once configured, you’ll be able to use it to monitor the traffic in and out of your home network using the SNMP capability in your network’s gateway\router. MRTG generates static HTML pages containing PNG images which provide a visual representation of this traffic. MRTG typically produces daily, weekly, monthly, and yearly graphs. MRTG is written in perl and works on Unix/Linux as well as Windows. MRTG is free software licensed under the GNU GPL.

Software versions used in this post were as follows:
  • Ubuntu Server v12.04 x64 LTS)
  • mrtg_2.17.3-2ubuntu1_amd64.deb

  • Download and Install

    First, download and install MRTG:
    sudo apt-get install mrtg
    If this is the first time installing MRTG on your server you’ll likely be presented with the following message. Answering “Yes” means that the default configuration file will be installed with permissions set at 640. Answering “No” means that the permissions are set at 644. In this example we’re going to accept the default Yes. No worries though, if you select No the steps in this tutorial will still work.

    Download Offline Installers: Microsoft .NET Framework 4.0, 3.5 SP1, 3.5, 3.0 & 2.0 From Microsoft Servers

    As many of the new Microsoft Windows applications are developed using .NET Framework, it is becoming mandatory to install .NET Framework on our personal computers.

    \
    Microsoft provides .NET Framework installer as a free download available to everyone. But it is an online installer. That means, initially we have to download a small piece of installer and upon starting the installation process the installer automatically connects to Microsoft servers and downloads the required components and completes the installation.
    The online installers works great as long as we have internet connectivity always. But many of us require offline installer to install the software on computers not connected to internet, to save the bandwidth while installing on many computers, etc.